In this series of articles, we want to talk about a platform that interests many iOS developers: the Mac. Whether you want to bring over your existing iOS app or just create something entirely new on the Mac — there’s something for everyone in OS X development. For developers who have spent the better part of their career building apps for iOS devices, making the move to the Mac is not only a dream, but can also be a little overwhelming since OS X carries a lot more baggage than iOS.
In this series of articles, we hope to dispel the myth of the Mac being difficult to develop for and offer some guidance for longstanding iOS developers by showing the development process for the Mac.
If you’ve been developing apps for iOS, the truth is that you’ve been developing using the same chain of tools and technologies that are also at the heart of OS X. And, while naming conventions and looks may be different, the underlying layers of iOS and OS X are nearly identical, although OS X is more complex system to develop for.
In this article, you’ll be introduced to the tools you’ll use to create Mac apps, the app and project structure, app lifecycle, and how to work with windows and view controllers on the Mac.
In the next article, you’ll build your first Mac app using Swift and modern Mac programming constructs, such as using Storyboards to construct the interface.
First to the Scene
One of the reasons iOS developers should be keeping an eye on the Mac is that most of the new iOS technologies start out on the Mac, then move to iOS. Take for instance the following Mac-first technologies available on iOS years later:
- Grand Central Dispatch
- AutoLayout
- StackViews
- SceneKit
- CoreData
- Keyboard Shortcuts
- Multitasking
- Garbage Coll… nevermind about that one
If you’ve been on the fence about learning to develop for OS X, then this should help clear that up: you can often learn new technologies before they’re available on iOS.
The Tools and Languages
OS X apps follow a similar structure to iOS apps and as such, you’ll use the same tools. In fact, the tools that you’ve been using in iOS development, namely Xcode, Interface Builder and the language Objective-C were initially built for the Mac (and were byproducts of the NeXT acquisition by Apple back in the late 1990s, which saw the development of OS X as the new operating system for the Mac).
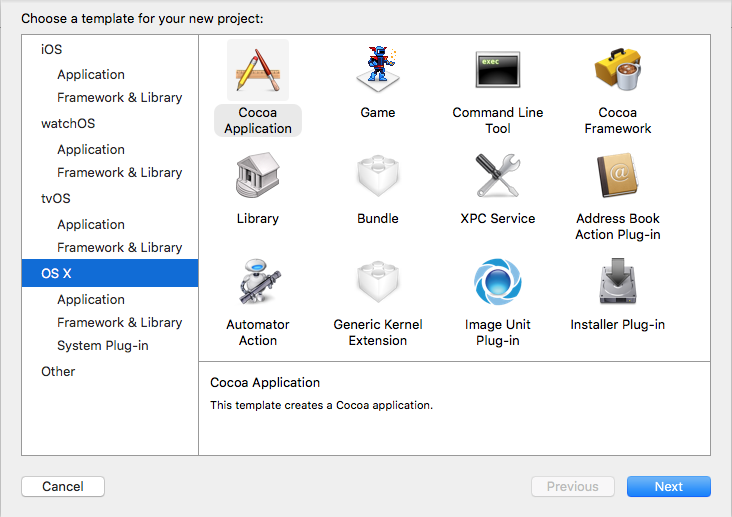
Whenever you create a new project in Xcode, you’ve probably noticed the “OS X” section. This section lists all of the different types of projects you can create. Let’s quickly cover each typically used type:
- Cocoa Application - This is the starting point for a Mac app that has Windows, and the traditional user interface we associate with apps on the Mac.
- Game - This is the starting point for a Mac game built with SpriteKit.
- Command Line Tool - Creates a starting point for a Mac app that can be run in the Terminal without any Aqua user interface.
- Cocoa Framework - Is a starting point for a framework project that uses the Cocoa underpinnings. This can be used to create frameworks for your other projects.
- Library - This is a starting point for a Library, which can link against the Cocoa Frameworks that you might create.
These are the most popular project types you might work with on the Mac. There are other, more specific project types that can be used to create all sorts of Mac extensions, such as the Automator Action, Quick Look Plugin, and even a Screen Saver, but those more specific project types are out of scope for this type of introductory article; however, you can find more information about implementing these project types on the Mac Library of the Apple developer documentation website.
The App Anatomy
A Mac app has a lot of different, more complex user interface elements than what you might find on an iOS app during normal development. Let’s look at each of the different types of interfaces and their nomenclatures.
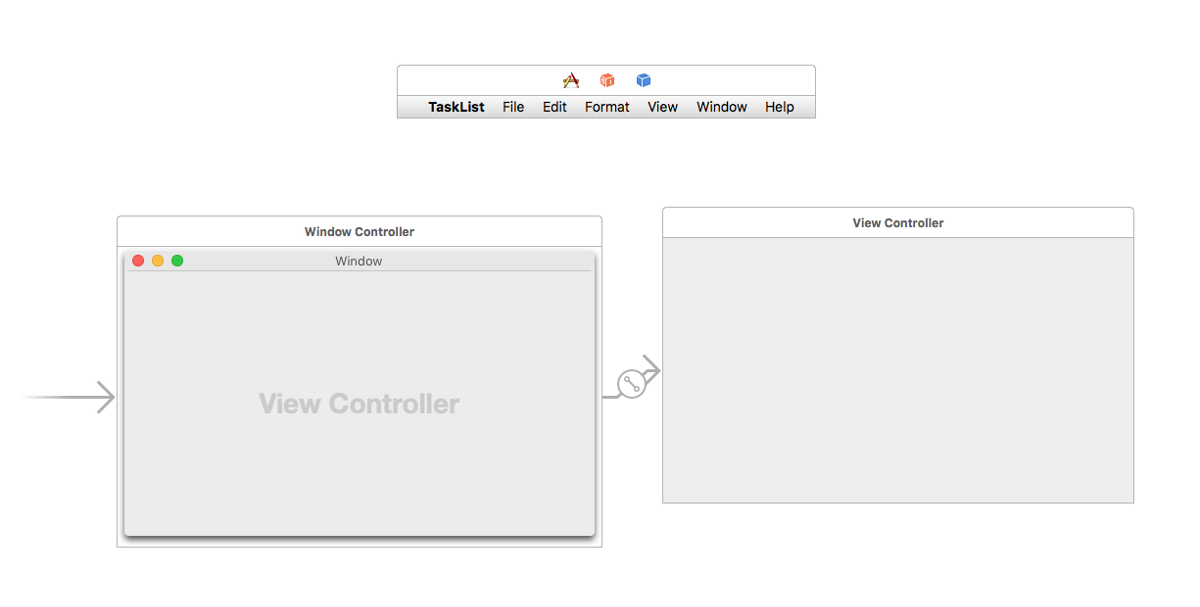
The Window
The most basic interface on the Mac is the window. A window (specifically NSWindow types) house your View Controllers and other views that make up the user interface. Unlike iOS apps, Mac apps can have multiple windows taking up screen real estate at any given time, depending on how complex the app needs to be.
Most modern OS X apps tend to rely on a single-window design, with additional windows only for preferences and other settings views. You’ll garner more experience with windows later in this article, and in Part 2.
The Menu Bar
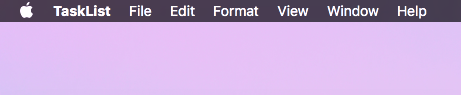
The menu bar on OS X houses controls and shortcuts that provide additional functionality to the app and can control various aspects about the window and user interface. By default, whenever you create a Cocoa Application, you’ll get File, Edit, Format, View, Window, and Help menu items. All of these items are customizable in the default XIB or Storyboard.
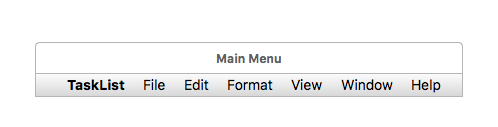
Just like any other user interface element in the Storyboard, the menu can be configured to support additional or fewer menu items, and each menu section can be reconfigured.
The Dock
The Dock is special to the Mac, and is uniquely different than anything found with the iOS home screen icon. Specifically, because your Mac app can run indefinitely, the Dock icon can be shown for long periods of time, even as the user transitions between your app and different apps using the Command + Tab app switcher. When it comes to the Dock icon, there are usually three main areas where first-time developers get stuck. Let’s cover each of them below.
Customizing the Dock Icon
Before OS X Yosemite and Xcode 6, adding a Mac icon was a bit confusing when coming from iOS where Xcode handles the creation of the icon file. OS X icon files are in a .icns format, which houses several different sizes since the Finder, Spotlight, and Dock can all resize the icon on the fly. These different sizes are automatically switched in and out by the system when the user resizes the Finder icon display or the Dock, ensuring the icons always look great regardless of the user preferences.
Because of this, you’ll need to supply the following icon sizes:
- 16pt at @1x (and a @2x variant for retina)
- 32pt at @1x (and a @2x variant for retina)
- 128pt at @1x (and a @2x variant for retina)
- 256pt at @1x (and a @2x variant for retina)
- 512pt at @1x (and a @2x variant for retina)
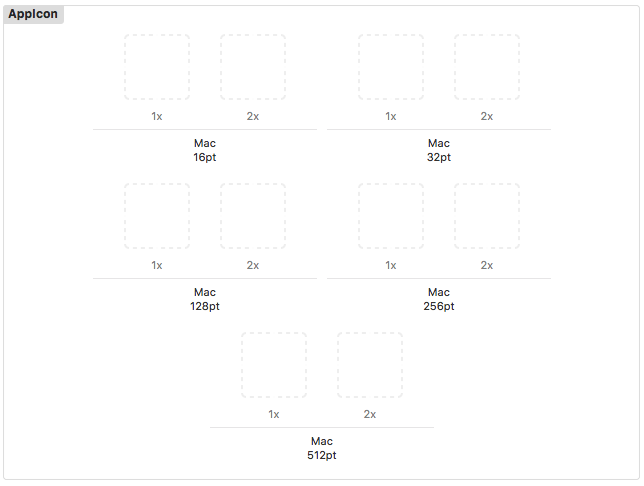
Whenever you’re ready to create the icon file, Xcode 7 can handle this for you automatically without using any other tools to create a .icns file. Simply open the ‘Assets.xcassets’ file and locate the “AppIcon” set. Plug in all of the various image files and you’re done.
Customizing the Dock Icon Click

Because the app is always running, even if the user closes the main window in the app (unless the developer specifies the app to close when closing the main window), the Dock icon will remain visible to the user. With most apps, clicking the Dock icon will result in making the main window visible again. If you’ve tried to build and run a sample project, then close the main window, you’ll notice that clicking on the Dock icon does nothing. This is because your app has to specify what happens when the user clicks the icon.
To do this, you’ll tie into a the Application Delegate method called applicationDidBecomeActive, which is called whenever your app gets focus, and allows you to place certain windows on the screen again. You’ll see this in action in the next part of this article.
Hiding the Dock Icon Entirely
Some Mac apps are strictly apps that run in the menu bar system tray and don’t require the Dock icon to be visible when running. For these apps, Apple provides a way to permanently disable the Dock icon display whenever the app is running. To do this, open the Info.plist file, and add the following key/value pair:
LSUIElement (String) : 1 (Int)
When launching the app with this Info.plist variable in place, the Dock icon will not be shown. If you wish to hide and show the Dock icon dynamically using a preference in the app, then check out this StackOverflow post.
Swift vs. Objective-C and Foundation Differences
If you’re already learning Swift or are a hardened Objective-C developer, you’re already half way to developing on the Mac — the same language, coding styles, and similar app structure will make you feel right at home developing for the Mac platform.
A lot of the Foundation framework classes and methodologies are shared between both the Mac and iOS platforms. There are a few differences, however, many are very subtle at first glance.
Before beginning OS X development, it is recommended that you read over the Foundation framework reference for OS X to get familiar with the similarities and differences between the iOS and OS X framework.
AppKit
If you’ve been a developer on iOS, then you’re probably very familiar with UIKit (the user interface classes used in iOS). On the Mac, you’ll use something known as AppKit, which comprises the classes needed to design and build your Aqua apps. Aqua is the user interface design style of the Mac, and it has been around since the first iterations of OS X back in 2001, but has changed significantly over the years, especially with the advent of OS X Lion (10.7), and further more with OS X Yosemite (10.10).
Before beginning OS X development, it is highly recommended that you read over the AppKit framework reference on the Apple developer website. This document provides a multitude of information about NSApplication, NSWindow, NSView, NSResponder, and the various subclasses that AppKit provides, from buttons (NSButton) to a table view (NSTableView). There are more than 170 such AppKit classes, and many will sound familiar to iOS developers, but will be have very different internal structures, properties, and methods compared to their iOS counterparts.
Mac Project Structure
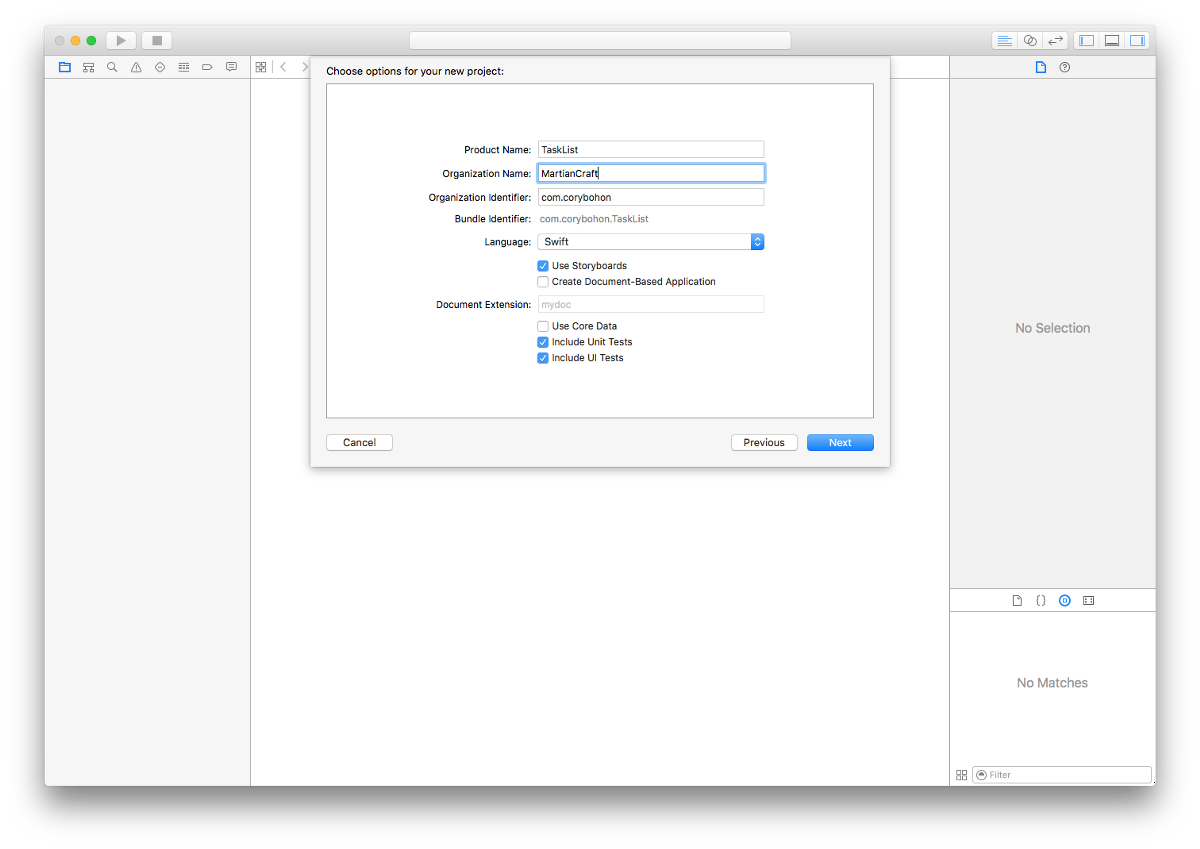
To talk about project structure, let’s first create a Cocoa application in Xcode:
- Open Xcode
- Select File > New > New Project
- Select OS X > Cocoa Application and click Next
- Enter your product name, select the language, and ensure that “Use Storyboards” is selected, then click Next to complete creating the project files.
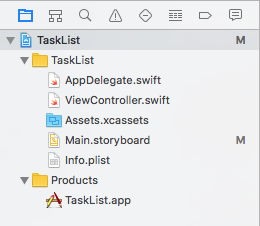
Let’s look at what each of these basic files controls:
- AppDelegate.swift — Just like the iOS AppDelegate class, this class is a singleton that is guaranteeded to always be running while your app is running. This class contains methods conforming to the NSApplicationDelegate protocol, and any other methods that you deem necessary to include.
- ViewController.swift — With the new project, Xcode automatically generates a single-window app with a single view controller. This NSViewController subclass is hooked up to that view controller scene in the Storyboard automatically.
- Assets.xcassets — Just like on iOS, XCAssets are also available on OS X and houses any images and the app icon for your binary.
- Main.storyboard — The main Storyboard file created by Xcode houses a single window (NSWindow) setup with a single view controller (NSViewController) by default along with the Main Menu (NSMenu) scene for the app.
- Info.plist — Just like with iOS apps, this property list file contains pertinent information for the app bundle, giving details to the OS about name, version number, and any specific manual settings for the bundle.
- XXX.app — This is the product that will be built. Unlike iOS .app binaries, which require an iOS device or simulator to run, OS X .app files are able to be run as soon as Xcode builds them: Go ahead and give it a try: Build and run this sample app to see the Window spring to life after a few seconds of building.
Throughout the process of creating an OS X app, you’ll build on this basic project structure, creating new NSWindow, NSViewController, and NSResponder subclasses that will allow your app to take advantage of the unique and powerful features available only on the Mac.
What’s with the Sandboxing?
OS X apps have free reign over the file system and what they choose to do with your files — Apple has tried long and hard to make the Mac App Store a safe place, however, that’s free from rogue apps that would do harm to users. As such, if you’re distributing an app to the Mac App Store, you must have Sandboxing enabled.
So, what exactly is Sandboxing, you might ask? Sandboxing an app on OS X essentially puts a fence around your app in the Mac’s file system. While your apps are running in Sandboxed mode, you will not have free reign of the file system, and will only be able to access documents and files stored within the Sandboxed documents folder or from a file or directory the user specifically gives your app access to.
Does this sound familiar? It’s the same methodology that has been on the iOS side of things since the release of iPhone OS 2.0, which brought about access to the documents directory on the file system on iOS devices. You’ll use the same NSFileManager and the same directory naming convention to access your documents within OS X apps that you would on iOS.

By default, OS X projects are not Sandboxed, so you’ll have to enable it by doing the following:
- Open the Project Settings in Xcode
- Select the Capabilities tab
- Enable the switch for “Sandboxing”
This will ensure your app is sandboxed and will not be rejected when submitting to the Mac App Store through iTunes Connect.
What’s Next?
We now have a basline for creating a new Mac app in Xcode and the areas to study before you deep dive into creating your first Mac project.
Next, in Part 2 of this article, we’ll delve into the process of creating a Mac app from the ground up in addition to explaining how Windows and View Controllers work together. Until then, check out the Apple developer documentation on the Mac for Foundation and AppKit and try your hand at a hello world app using the sample project built in this article.