
You may have used a Mac application before that launches at login (Dropbox, 1Password, and other apps do this). Launching at login allows the users to immediately begin using an application instead of having to manually launch it. This can be particularly useful if you have a menu bar application that launches without a Dock icon to get in the way.
Login Items have previously been a way for OS X apps to provide this service to users, but is not compatible with the sandbox requirements of the Mac App Store. Fortunately, there is a much more modern way to handle this, and I’ll walk you through setting it up in your own projects.
Rules surrounding ‘launch at login’ apps
Before you begin, you should know about a specific rule surrounding ‘launch at login’ in the Mac App Store developer requirements list.
This rule is outlined in the Mac App Store Review Guidelines document:
2.26 Apps that are set to auto-launch or to have other code automatically run at startup or login without user consent will be rejected
The easiest way to meet this requirement is to include a user preference in your application’s Preferences view that lets the user toggle between launching the app at login and not launching the app at login. We’ll show you how to do this and meet the sandbox requirements of the Mac App Store in the implementation details below.
How it works
In order to launch our application at login, we’ll create a separate application that is included in the signed main application bundle. The sole purpose and function of this separate application will be to launch our main application at login, if it is not already launched.
This may sound counterintuitive, but in practice, it’s both fairly easy to implement, and just works.
Setting up your project
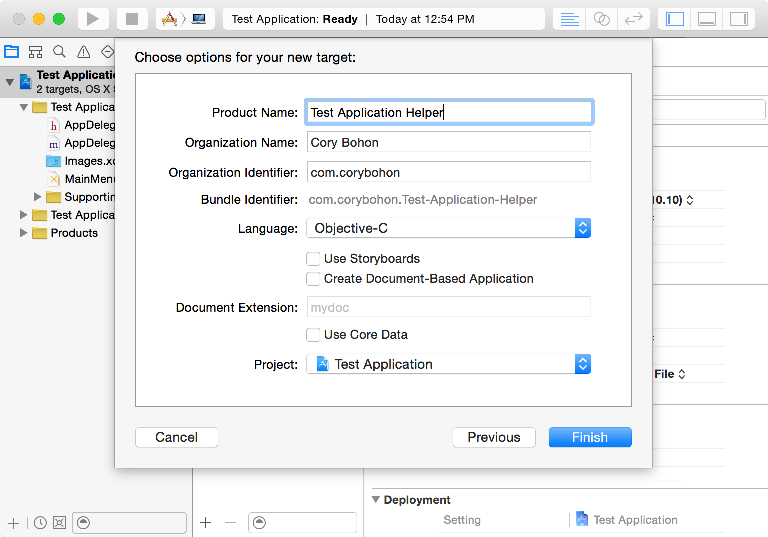
There are a number of setup steps required in Xcode to create the login item helper application. To begin, open your existing Mac application in Xcode, and select the Test Application project file in the sidebar, then perform these steps:
- In the General tab, select the + button in the
Project and Targetslist, and create a new OS X Cocoa Application. Click next. - We’ll name the Product “X Helper,” where “X” is the name of the main application (this is just what we are calling it, but you can call it anything you’d like)
- Ensure that the main application Xcode project is selected in the Project drop-down menu.
- Click Finish, and you’ll see the new application target added to your Xcode project.
Once you’ve done this, you’ll want to add the Apple ‘ServiceManagement.framework’ framework to your base application project.
Next, open the Build Settings tab for the target of the base application, and search for the item called ‘Strip Debug Symbols During Copy’, and set this item to ‘NO’.
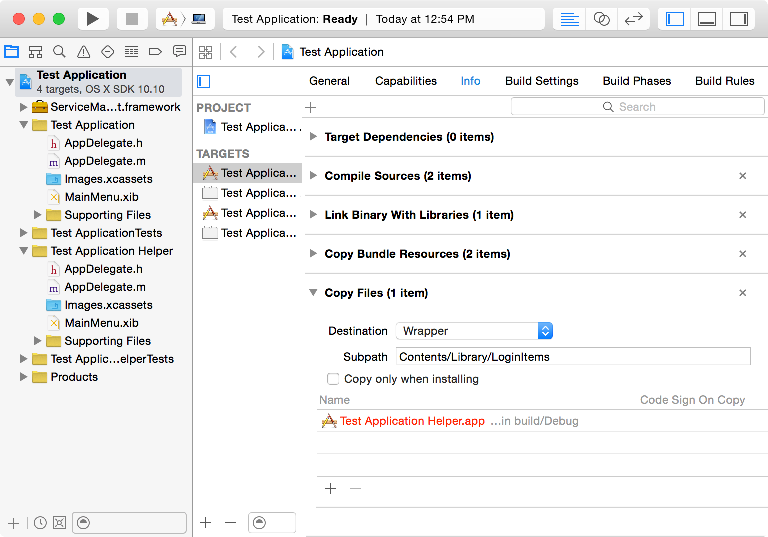
Finally, let’s visit the Build Phases tab for the base application, and do the following:
- If you don’t already have a ‘Copy Files’ phase, then add one by selecting the small + sign in the top left corner of this section.
- Expand the ‘Copy Files’ phase, and select ‘Wrapper’ from the Destination drop-down menu
- In the
Subpathsection, type the following path:Contents/Library/LoginItems - Select the + button for the
Namesection, then search for and add the ‘X Helper.app’ application bundle from the source list that appears, and select it in the list. Click ‘Add’ when done.
This will ensure that the Helper target is copied into our application bundle when we compile the project.
Setting Up the Helper Project
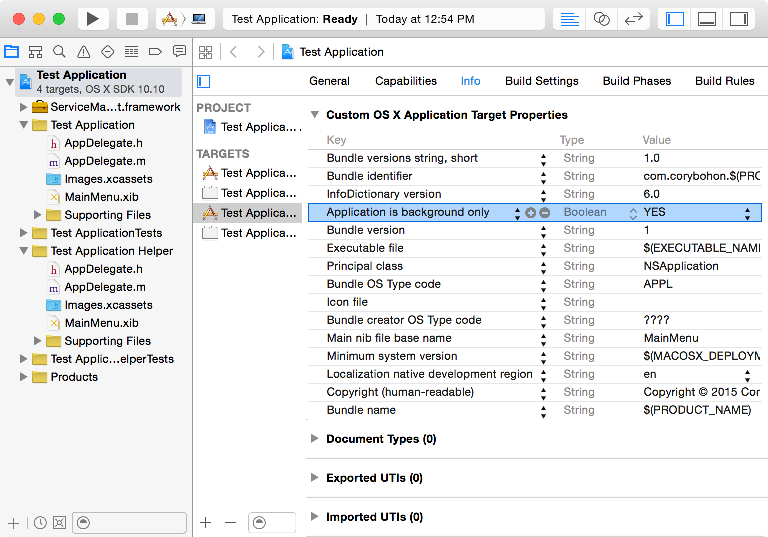
The first thing that we need to do to the Helper project is to ensure that we set a target property so that the application only runs in the background and doesn’t display a Dock icon. Do this by following these steps:
- Click the base project in the source list
- Select the
Helperapplication target in the ‘Targets’ sidebar - Click the ‘Info’ tab
- Under the ‘Custom OS X Application Target Properties’ section, add a new row with the Key ‘Application is background only’ and the
Booleanvalue of ‘YES’
Next, we’ll ensure that this helper application skips the install when the base application also gets installed. To do this:
- Select the
Build Settingstab for the ‘Helper’ application - Search for ‘Skip Install’, setting this option to ‘YES’
As a final step for the Helper application, you’ll want to open the Helper app’s XIB file and remove the base Window from the file.
Additional Notes
Note that when submitting the application to the Mac App Store or Developer Signing, you’ll need to make sure that both application targets are signed and Sandbox entitlements are added in order to avoid any submission and/or launching issues.
Writing the Helper code
Once you’ve set up the project, it’s time to get to the actual code that powers the Helper application, allowing it to launch the base app. You’ll want to add the following code to the -applicationDidFinishLaunching: delegate method in the Helper app’s Application Delegate implementation file:
NSArray *pathComponents = [[[NSBundle mainBundle] bundlePath] pathComponents];
pathComponents = [pathComponents subarrayWithRange:NSMakeRange(0, [pathComponents count] - 4)];
NSString *path = [NSString pathWithComponents:pathComponents];
[[NSWorkspace sharedWorkspace] launchApplication:path];
[NSApp terminate:nil];
That’s it for the Helper application… its sole job is to find out the path for the main application, launch it, and then terminate itself.
Adding a user preference
What’s a Login Item if the user cannot set their preference for it? Let’s take a look at the code that will do this:
#import
...

if (!SMLoginItemSetEnabled((__bridge CFStringRef)@"com.corybohon.Test-Application-Helper", YES)) {
  NSLog(@"Login Item Was Not Successful");
}
This code uses the ServiceManagement framework’s function called SMLoginItemSetEnabled. The first parameter in this method is a CFString containing the bundle identifier of your Helper application. The second parameter is a BOOL indicating whether the Helper should launch at login or not. Replace the YES here with a BOOL value indicating whether or not the application should launch at login (YES means that it will launch at login, while NO means that it won’t).
Notes about testing
In order to make this work, you’ll need to have the application inside of the /Applications folder on your Mac. In addition, you should ensure that both the base application and the Helper application have their bundles signed, and that they are both sandboxed. If they are not sandboxed and signed with a valid certificate and profile, then the Helper application will not launch properly, and will be unable to launch the base application.
The sample application used in this tutorial is available to download.