
Apple announced the newest version of Xcode, Xcode 9, at WWDC ’17. There’s a ton of new features in the latest version, but I wanted to highlight one of these features that stuck out to me as being a huge time saver for designers and developers alike, and that’s the changes to asset catalogs.
Asset catalogs have grown to be a highly utilized feature for us, and I’m excited about two of the new features: “Preserve Vector Data” and color assets. Let’s take a deeper look at these two new features.
Preserve Vector Data
A few years ago, I posted about using PDF Vector assets in iOS. While this tutorial still works great in Xcode 9, there are some big changes in the way vector data can be used in iOS 11 and Xcode 9.
Since iOS 8, vectors have been able to be used in asset catalogs, but Xcode would compile down the vectors into static images at a set size; the images could not be scaled up or down at runtime without the images becoming distorted.

This all changes with Xcode 9 and iOS 11: There’s a new checkbox in the Asset Catalog Attributes Inspector called “Preserve Vector Data.” Checking this box will ensure that Xcode includes a copy of the PDF vector data in the compiled binary. At runtime, iOS can automatically upscale or downscale the vector data to output an image in your app whether you’re using the image in code or in a Storyboard scene. Remember: When using PDF vector data, set the “Scales” value to “Single Scale” in the Attribute Inspector to ensure the proper loading the PDF vector data to populate image.
This change also works in conjunction with the new Tab Bar icon HUD that Apple implemented as an accessibility feature in iOS 11. If you enable “Preserve Vector Data” this feature comes to your apps with no additional work. By enabling this feature, iOS 11 can also automatically scale images regardless of whether you’re increasing a UIImageView’s bounds, or using Size Classes to change an UIImageView size.
So, there must be a caveat right? Well, there is, sort of: This will increase the size of the compiled binary due to the extra data. When you consider that you’re no longer having to include various images sizes; however, that isn’t really a downside at all.
What if I’m targeting iOS 10?
If you’re using the “Preserve Vector Data” option in the Asset Catalogs, you will still be able to use the same vector-based images on iOS 10; however, the images will not be scaled up using the additional vector data. It will use the older scaling mechanisms and will leave you with a blurry image when scaling up beyond the original PDF size.
Color Assets
One of the niftiest additions to Asset Catalogs in Xcode 9 is the ability to add your color palette right alongside of your images. Before this addition, we often found ourselves creating a Swift class that had methods to return UIColor objects for the colors we’d use throughout our app. This makes everything much cleaner.
Before beginning, however, you’ll want to make a decision on if you want colors added to the same Asset Catalog as images. You can, of course, separate the colors from the images by adding Groups to the catalog; or, you can do as we’ve done, create a new Asset Catalog just for colors. By doing this, you’ll be able to easily move color-only Asset Catalogs to other projects without bringing over the images, if multiple apps share the same color palettes. In this tutorial, we’ll create a separate catalog to house the colors.
To do this and add a color asset to the new Asset Catalog, perform these steps with your project open in Xcode:
- Select File | New | File
- Select “Asset Catalog” as the type to create and name it “Colors”, ensuring that it’s included in the appropriate Targets
- Open the “Colors” Asset Catalog that was just created
- Press the “+” button in the bottom of the list pane and select “New Color Set”
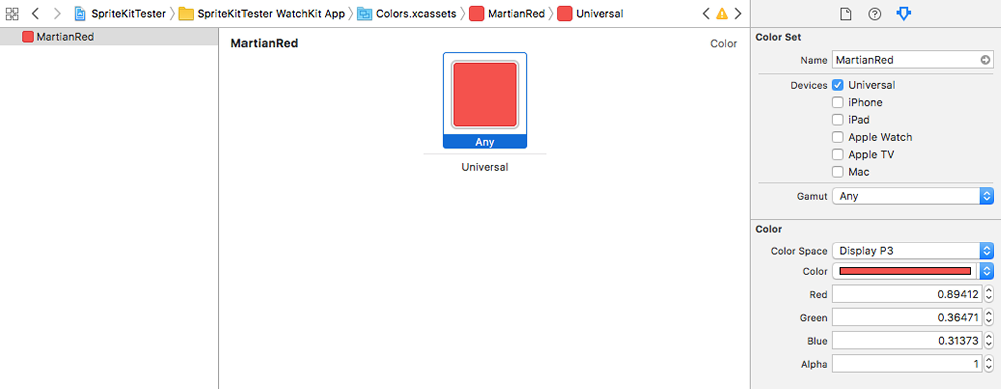
- Select the color and open the Attributes Inspector
- Name the color in the name field, select the Color Space to be used, and finally specify the RGBA values in decimal form (divide the integer RGB values by 255).
Follow these steps to create as many color assets as needed by your app. Then, when you want to use this color in code, it’s as simple as doing this in Swift:
if #available(iOS 11.0, *)
  let color: UIColor = UIColor(named: "MartianRed")!
  self.view.backgroundColor = color
}
Or, if you’re using Objective-C, you can do this:
UIColor *color = [UIColor colorNamed:@"MartianRed"];
[self.view setBackgroundColor:color];
You can also access these colors inside of Storyboard scenes by selecting the “Color” drop down in the Attributes Inspector. There’s a new section named “Named Colors” that will list all colors defined in the project’s Asset Catalogs.
With this new addition, all developers will hopefully start embracing easily changeable color values throughout apps without having to write any extra code to have this functionality.