In the first part of the iOS to Mac development series here on The Syndicate, we discussed the tools, macOS app anatomy, languages, and SDK differences between iOS and macOS. Reading through the documentation, you’ve probably noticed a lot of differences in the way macOS handles interfaces and view controllers, especially since macOS apps can handle multiple windows displayed at the same time.
In this final conclusion of the article, you will learn about view controllers on macOS and how they work with windows and views.
About Reminderz
There’s no better way to learn about creating a macOS app than to actually create an app, so in this article, we’ll build out an app called “Reminderz” (it has a “Z” in the name, so it’s totally investor-worthy and totally hip… that’s still cool, right? Good, then we’ll secure the .io domain name).
Reminderz is, well, a todo list app with the following capabilities:
- Ability to easily add a new todo
- View todos in a table view
- Delete a previously created todo
- Store todos in the NSUserDefaults store as an array
- When a todo is created, schedule a local notification so the user will remember the item at any given time
- When a todo is deleted, remove the local notification so the user won’t be reminded for deleted tasks
Project Setup
Creating the Project
Start by opening Xcode and following these steps:
- Select File | New | Project
- Select macOS | Application | Cocoa App
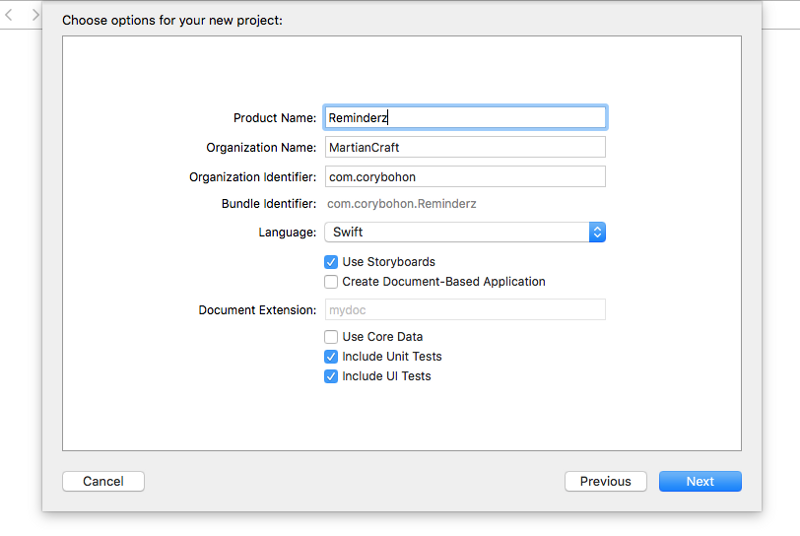
- In the new project settings view, enter the product name as “Reminderz,” ensure that Swift is the selected Language option, and ensure that “Use Storyboards” is checked, then click Next
- Select a location to save your project, just as you would with an iOS app project.
Configuring the AppDelegate
To begin, we want to configure the AppDelegate for the type of app we’re building. For this particular app, we will use a single-window construction, and one of the common features of apps with a single window in macOS Lion and later is to have the app close whenever the user closes the last window.
To do this, open the AppDelegate.swift file and add the following method:
func applicationShouldTerminateAfterLastWindowClosed(_ sender: NSApplication) -> Bool {
        return true
    }
Returning true in this method causes the app to automatically close when the user closes the last window (or in our case, our only window), which is exactly what we want for this app.
Creating the Data Manager
In order to save, load, and schedule notifications for reminders stored in the Reminderz app, we will first create a data manager. This manager will handle all of these tasks.
First, however, we need to create our base reminder class that the app uses. This object is called “TodoItem” and it has two properties: todoName (String) and todoDueDate (Date).
Create a new Swift file and add the following class definition:
import Cocoa

class TodoItem: NSObject, NSCoding {

    var todoName: String = ""
    var todoDueDate: Date = Date()

    init(name: String, dueDate: Date) {
        todoName = name
        todoDueDate = dueDate
    }

    required init?(coder aDecoder: NSCoder) {
        todoName = aDecoder.decodeObject(forKey: "todoName") as! String
        todoDueDate = aDecoder.decodeObject(forKey: "todoDueDate") as! Date
    }

    func encode(with aCoder: NSCoder) {
        aCoder.encode(todoName, forKey: "todoName")
        aCoder.encode(todoDueDate, forKey: "todoDueDate")
    }

    override func isEqual(_ object: Any?) -> Bool {
        var objectsAreSame: Bool = false

        if let secondTodo: TodoItem = object as? TodoItem {
            if secondTodo.todoDueDate == todoDueDate &&
                secondTodo.todoName == todoName {
                objectsAreSame = true
            }
        }

        return objectsAreSame
    }
}
In the TodoItem code above, the class conforms to NSCoding, since we will be storing multiple TodoItem objects in an array, then serializing that array to disk using UserDefaults. We implement a custom initializer to more quickly instantiate an object. Lastly, the class overrides the isEqual function to check and see if a passed in TodoItem object is the same as the current one. This will be used with our array handling later on.
Now on to the DataManager class, which will handle loading, storing, and removing TodoItem objects for the app. Create a new Swift file called DataManager.swift, and then copy the following code into the class.
import Cocoa

class DataManager: NSObject {

    static let shared = DataManager()

    var storedTodos = [TodoItem]()

    override init() {
        super.init()

        if let data = UserDefaults.standard.object(forKey: "todoItems") as? Data {
            storedTodos = NSKeyedUnarchiver.unarchiveObject(with: data) as! Array<TodoItem>
            self.save()
        }
    }

    func add(item: TodoItem) {
        storedTodos.append(item)
        save()
    }

    func remove(item: TodoItem) {
        if let index = storedTodos.index(of: item) {
            storedTodos.remove(at: index)
            save()
        }
    }

    func save() {
        storedTodos.sort { (todo1: TodoItem, todo2: TodoItem) -> Bool in
            if todo1.todoDueDate.compare(todo2.todoDueDate) == .orderedDescending {
                return true
            }
            return false
        }

        let data = NSKeyedArchiver.archivedData(withRootObject: storedTodos)
        UserDefaults.standard.set(data, forKey: "todoItems")
        NotificationCenter.default.post(name: NSNotification.Name("dataChanged"), object: nil)
    }
}
Let’s look at each one of the class methods:
- init handles loading the existing items from the UserDefault data store and placing them into an array in the class called
storedTodos - add handles appending a new todo to the
storedTodosarray, then calling the save method - remove checks to see if the todo needing to be removed is included in the
storedTodosarray, then takes care to remove the item using the recovered index and call the save method - save is a method that handles sorting the array based on the date to ensure it’s ordered descending by the todoDueDate variable, then using NSKeyedArchiver to serialize the data to disk using UserDefaults. Finally, it posts a Notification called
dataChanged, which will cause the view controller, created in the next section, to update the table view and display any newly added or removed data.
Creating the View Controller
First, a little about NSViewController…
NSViewController is a similar to UIViewController on iOS in that it has various methods that gets called throughout the view lifecycle:
- viewDidLoad
- viewWillAppear
- viewDidAppear
- viewWillDisappear
- viewDidDisappear
Through these view controller events, you can setup and teardown a view controller on macOS just like on iOS. These lifecycle methods are available beginning in macOS 10.10 (Yosemite).
In addition, NSViewController has a view that contains user interface elements added through either a XIB or a Storyboard scene (with macOS 10.10 and higher, Storyboards are now preferred).
Now that you know a little more about the lifecycle methods of NSViewController, let’s build out the main interface controller in Swift. When you created a Cocoa Application project, a single view controller was automatically created for you called “ViewController.swift.” Open this file, and edit it to look like the ViewController code below:
class ViewController: NSViewController, NSTableViewDelegate, NSTableViewDataSource {

    @IBOutlet var tableView: NSTableView!
    @IBOutlet var todoNameField: NSTextField!
    @IBOutlet var todoDueDatePicker: NSDatePicker!

    let dateFormatter: DateFormatter = DateFormatter()

    override func viewDidLoad() {
        super.viewDidLoad()

        todoDueDatePicker.dateValue = Date()
        todoNameField.becomeFirstResponder()

        dateFormatter.dateStyle = .short
        dateFormatter.timeStyle = .short

        tableView.delegate = self
        tableView.dataSource = self

        NotificationCenter.default.addObserver(self, selector: #selector(updateData(sender:)), name: NSNotification.Name("dataChanged"), object: nil)
    }

    @IBAction func saveButtonClicked(_: Any) {
        if todoNameField.stringValue.count > 0 {
            let todo = TodoItem(name: todoNameField.stringValue, dueDate: todoDueDatePicker.dateValue)
            DataManager.shared.add(item: todo)
todoNameField.stringValue = ""
            todoDueDatePicker.dateValue = Date()
        } else {
            let alertView = NSAlert()
            alertView.alertStyle = .informational
            alertView.messageText = "Todo name is invalid"
            alertView.informativeText = "The name field must have a value before adding the todo to the list."
            alertView.runModal()
        }
    }

    // MARK: TableViewDataSource and TableViewDelegate
    func numberOfRows(in tableView: NSTableView) -> Int {
        return DataManager.shared.storedTodos.count
    }

    func tableView(_ tableView: NSTableView, viewFor tableColumn: NSTableColumn?, row: Int) -> NSView? {
        let todo = DataManager.shared.storedTodos[row]

        var cellValue = ""
        var cellIdentifier = NSUserInterfaceItemIdentifier("")

        if tableColumn?.identifier.rawValue == "itemColumn" {
            cellValue = todo.todoName
            cellIdentifier = NSUserInterfaceItemIdentifier("nameCell")
        } else if tableColumn?.identifier.rawValue == "dueDateColumn" {
            cellValue = self.dateFormatter.string(from: todo.todoDueDate)
            cellIdentifier = NSUserInterfaceItemIdentifier("dateCell")
        }

        if let cell = tableView.makeView(withIdentifier: cellIdentifier, owner: nil) as? NSTableCellView {

            cell.textField?.stringValue = cellValue

            if todo.todoDueDate.compare(Date()) == .orderedAscending {
                cell.alphaValue = 0.25
            }

            return cell
        }

        return nil
    }

    @objc func updateData(sender: NSNotification) {
        tableView.reloadData()
    }

    // MARK: Keyboard Shortcuts
    override func keyDown(with event: NSEvent) {
        interpretKeyEvents([event])
    }

    override func deleteBackward(_ sender: Any?) {
        let selectedRow: Int = tableView.selectedRow
        if selectedRow == -1 {
            return
        }

        DataManager.shared.remove(item: DataManager.shared.storedTodos[selectedRow])
    }
}
Let’s cover each section in-depth to get a feel for what this controller is doing:
- There are three IBOutlets: tableView (an NSTableView instance), todoNameField (NSTextField instance) which is the text field where the user will specify the title of their todo, and a todoDatePicker (an NSDatePicker instance) that will allow the user to choose the date and time the todo item should occur. Lastly, there’s a constant
dateFormatterthat holds onto the DateFormatter object that will be used to format date strings before display. - In the viewDidLoad method, we will first ensure the date picker is instantiated with the current date, and then set the todoNameField as the first responder. Next, the dateFormatter is set up, and the data source and delegate for the table view is set. Lastly, we’ll subscribe to the
dataAvailablenotification to get notified via NSNotificationCenter when new information has been added or removed. - In the saveButtonClicked method, which is an IBAction will be tied to a button in the interface, we first check to see if the todoNameField has character length. If the the field has a character length of 1 or greater, then call out to the DataManager and pass in the stringValue of the todoNameField and the Date from the date picker in order to add a new item before finally clearly the field and setting the date picker back to the current Date value. If there is no character length on the text field, then an NSAlert is created and run modally to alert the user they must enter text into the name field.
- numberOfRowsInTableView method is part of the NSTableViewDataSource protocol, and just like with UITableView, we’ll return the number of rows that the table view will contain based on the data in the DataManager.storedTodos array.
- tableView,viewForTableColumn,row is another NSTableViewDataSource method that configures the individual table view “cells” for each column in the table view. Unlike with iOS, macOS table views can have multiple columns and rows. In this method, we first fetch the TodoItem object in the DataManager.storedTodos array using the row index. From there, we switch on the tableColumn.identifier to determine which data will be used for this particular column. Next, using the stringValue that should be displayed in the cell, and the cellIdetifier, we call the tableView.makeViewWithIdentifier method, passing in a cellIdentifier. This method returns an NSTableCellView, which will has a textField that will have it’s stringValue property set to the stringValue variable created at the start of this method. Lastly, we perform a check to see if the todoDueDate is in the past, and if it is, then the alphaValue of the NSTableCellView is reduced to 0.25. Finally, return the newly minted cell and NSTableView will take care of presenting it to the user.
- The updateData method is called whenever the DataManager fetches, adds, or removes items from the NSUserDefaults store. When this method gets called, it calls self.tableView.reloadData() in turn, which is just like the iOS UITableView method and causes a reload of the entire table view to happen.
Laying Out the Storyboard Scene
Now that the view controller code has been completed, it’s time to lay out the interface in a Storyboard. To begin, open the Main.storyboard file.
You should see something that looks like the screenshot below.
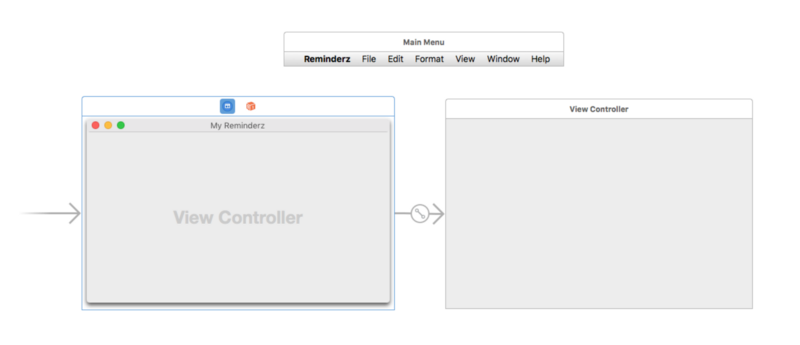
This is the standard layout for a new Cocoa Application template. To the top is the Main Menu scene that shows the menu bar items that will appear in the top left of the screen when the app is running and the frontmost app.
To the left, there is an NSWindowController instance with an NSWindow embedded inside. The windowContent property of NSWindowController is set to the NSViewController on the right through a segue-style link.
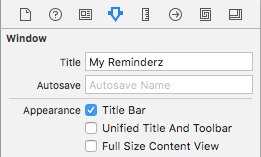
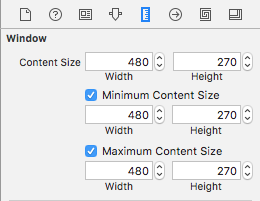
The NSWindow instance defines window height, width, and window title. Select the Window in the scene, and open the Attributes Inspector. Set the “Title” property to “My Reminderz.” Next, open the Size Inspector and set the Minimum Content Size and Maximum Content Size to 480w x 270h as the window we’ll create will not be resizable.
Next, let’s move onto the NSViewController instance, which has the class set to ViewController in the project. Begin creating the UI by first dragging out an NSTableView from the Object Library. Apply the following AutoLayout constraints just as you would to a view in iOS:
- Table View to View Controller Leading = 0
- Table View to View Controller Trailing = 0
- Table View to View Controller Top = 0
- Table View height = 120
The view will now look like this:
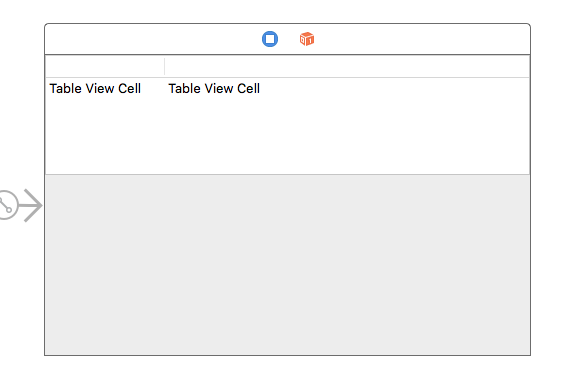
Next, double-click the table header view for the first column and rename it “Item,” then, do the same for the second column renaming it “Due Date.” Next, drag out the following objects:
- Label titled “Todo Name:”
- Label titled “Due Date:”
- NSTextField placed to the right of the “Todo Name:” Label
- NSDatePicker placed to the right of the “Due Date:” Label
- NSButton titled “Add Todo” that is centered to the View Controller and below the “Due Date” label and date picker
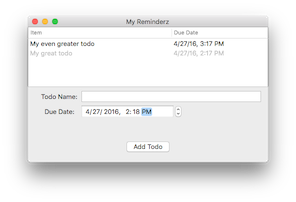
When you are done, add AutoLayout constraints to the newly added objects to make it look like the following finished product:
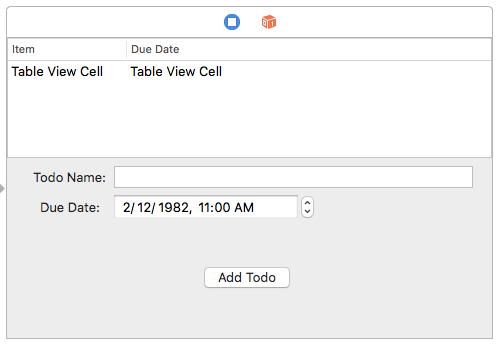
Now that all of the UI elements are in place, the IBOutlets to the table view, name text field, date picker, and wire the IBAction of the todo. You can do this by Control + dragging from the ViewController object in the Storyboard scene to all of the objects to assign IBOutlets, and from the button to the ViewController object to assign the IBAction, just like with iOS.
If you run the app at this point, you may notice that the app runs, and you’re able to create a new todo; however, nothing appears in the table view. This is due to the fact that the identifiers for the cells hasn’t yet been set.
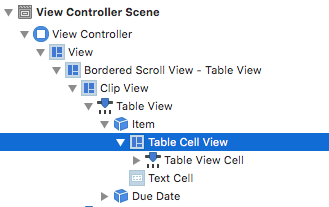
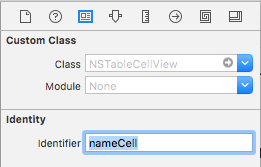
To set the identifier for these cells, select the “Table Cell View” under the Item column in the scene outline view, then open the Identity Inspector with this view selected, ensuring “nameCell” is added. Repeat this for the Due Date Table Cell View, ensuring the identifier is set to “dateCell.”
Now when you build and run the app, you’ll notice the items appear now that the cells are being registered and populated appropriately in the table view.
After setting the identifier for the individual cells, click the column object called “Item” and “Due Date,” adding the column identifier of “itemColumn” and “dueDateColumn”, respectively.
Adding Keyboard Shortcuts for Deleting Items from Table View
The Mac relies a lot on keyboard shortcuts, because instead of iOS where input is mainly touch-driven, the Mac is completely driven by keyboard and cursor-based input.
NSResponder (similar to UIResponder on iOS) provides method callbacks such as keyDown and deleteBackward. Whenever there’s a key down event, this method lets the system interpret the key event, which will in turn march up the responder chain, looking for a view that can handle the key event. In the event that the delete key is pressed, then the deleteBackward method will be executed. In this method, we request the selectedRow, an integer value, from the tableView. We check to see if this value is -1, which NSTableView returns when no row is selected. Finally, we call the removeTodoItem method on the DataManager instance, passing in the todoItem to be removed.
Below is the code that needs to be added to ViewController.swift to add keyboard shortcuts to the table view:
// Keyboard shortcuts
override func keyDown(theEvent: NSEvent) {
	interpretKeyEvents([theEvent])
}

override func deleteBackward(sender: AnyObject?) {
	let selectedRow: Int = self.tableView.selectedRow
	if selectedRow == -1 {
		return
	}

	DataManager.sharedInstance.removeTodoItem(DataManager.sharedInstance.storedTodos[selectedRow])
}
Working with the Responder Chain
As we mentioned above, keyboard shortcuts are very important, and users being able to navigate through your app using only keyboard shortcuts is vital to some users. The way this is accomplished on macOS is through the tab key — as the user presses tab, the application automatically moves on to the next responder.
In macOS, you can chain up responders in Storyboards, allowing the user to move from one view to the next using the tab key.
We’ll add this to the app by opening the ViewController scene in the Storyboard and selecting the Todo Name Field in the outline view, then open the Connections Inspector. Note the nextKeyView outlet — drag from the outlet to the next NSView subclass in the scene that should be moved to whenever the user tabs from the current view.
For this app, add connections for the following views:
- From the Todo Name Field to the Due Date Picker
- From the Due Date Picker to the Add Todo Button
- From the Add Todo button to the Table View
- From the Table View to the Todo Name Field
Now, whenever you build and run the app and tab through the interface, the Todo Name Field will be the first responder (as this is set in code when the View Controller first loads), then you will be able to tab in order from the date picker, to the add button, to the table view, and then back to the todo name field.
Adding Local Notification Reminders
Local notifications are a feature of this app: Whenever you add a todo, you’ll want to have a notification scheduled so that even if the app is closed, macOS will remind you about the todo item. Notifications have long been a feature of iOS, and macOS includes the same functionality for scheduling both remote and local notifications. In this example, we’ll use the local notification model to schedule notifications for the user since that implementation makes the most sense.
Add the following code (replacing the existing addTodoItem and removeTodoItem code) in the DataManger.swift file:
func add(item: TodoItem) {
        storedTodos.append(item)
        save()
        createNotification(name: item.todoName, date: item.todoDueDate)
 }

func remove(item: TodoItem) {
        if let index = storedTodos.index(of: item) {
            storedTodos.remove(at: index)
            save()
            removeNotification(name: item.todoName, date: item.todoDueDate)
        }
}

func createNotification(name: String, date: Date) {
        let notification: NSUserNotification = NSUserNotification()
        notification.deliveryDate = date
        notification.title = "Reminderz"
        notification.subtitle = name
        NSUserNotificationCenter.default.scheduleNotification(notification)
    }

    func removeNotification(name: String, date: Date) {
        for notification in NSUserNotificationCenter.default.scheduledNotifications {
            if notification.subtitle! == name && notification.deliveryDate?.compare(date) == .orderedSame {
                NSUserNotificationCenter.default.removeScheduledNotification(notification)
            }
        }
    }

    func removeOldNotifications() {
        NSUserNotificationCenter.default.removeAllDeliveredNotifications()
    }
In the createNotification method, a new NSUserNotification (similar to UILocalNotification) is created with a title, subtitle, and deliveryDate that the user selected, then is registered the NSUserNotificationCenter.
The removeNotification method searches through the scheduled notifications in NSUserNotificationCenter, finds the matching scheduled notification, then removes it so the user will no longer be notified for deleted todo items.
Building and Running
Once all of the code is in place, build and run the app. You’ll notice that we’ve now fulfilled all of the requirements set out originally in the first part of this post. The app can create todos, which in turn schedules local notifications. You can also delete existing to dos and remove their scheduled local notifications.
Congratulations on building your first Mac app. There are many things that are still to be learned to build more sophisticated macOS apps, but this small project will hopefully help you to start looking at the Mac with more open eyes.
Get the Sample Code
If you don’t want to follow along with the example above, then check out the sample code for the app built in this post.