Last year, I took over the lead development role on a large older app for a MartianCraft client. This app is critical for the client’s business, but through the years, over a dozen different developers had worked on it. Going around the code, you could see the layers of work from different developers in their different coding styles. It was almost like looking at layers of sedimentary rock formed from the features added by different hands.

A project collecting different coding styles like this might seem like a superficial issue. As long as the code compiles, what difference does it make if the style is consistent? But consistent readability is critical for new developers to understand the code and the expected coding style.
Most prose, like this blog post, is written once to be consumed as-is for eternity. Code is different: It needs to be written so that future developers can evolve it to meet new requirements. If it’s hard to understand what the code is doing, future bugs are bound to creep in.
Linting can be a great way to solve this.
What is linting?
Stephen C. Johnson coined the term “linting” in 1978 for code at Bell Labs. The idea is that a linter should catch all the little mistakes and problems in code just like a dryer pulls extra lint away from clothes. The goal was to help programmers focus on the logic of the code and let the linter worry about formatting and interoperability.
One of the practical advantages I find with linting is that a linter is not a human. You might have worked with someone in the past who always asked for stylistic code changes in pull requests. While style is important and worthy of pull request feedback, a linter can remove this kind of churn — not to mention the politics of having someone repeatedly nagging a teammate with this kind of feedback. Although the rules are controlled by the team, the warning and error feedback feels more like your IDE telling you to change something.
Using SwiftLint
For the iPhone app project I lead, I chose SwiftLint, a widely adopted open-source tool for linting Swift code that I had previous experience with. SwiftLint can run as a script in a build phase in Xcode. When you compile your code, the linter checks it and adds warnings or errors on anything that violates the customized list of rules for your codebase. Warnings are just that, but errors stop the build from running until they are fixed. This can be particularly nice with something like GitHub Actions or other continuous integration, because linters can stop the packaging and deployment of a build due to a rule violation.
To adopt SwiftLint, the first step is to add it to your project by installing the package locally and adding the build phase of the project. A collection of rules will be checked by default; you need to work through what rules make sense for your needs, turning rules on/off or customizing them in the SwiftLint YAML file.
The SwiftLint GitHub page is a great resource for these steps, so I’m not going to rehash all the details here. But at a high level, there are a few things you will generally configure in your YAML file:
- Disabled rules: These are rules on by default that you want to opt out of for your project.
- Directories scanned: You can include or exclude certain directories of files in your project.
- Opt-in rules: These are rules that are not on by default, whether because they throw more warnings or errors, they are slow to run, or they just don’t have complete consensus across the industry. If you want to apply them, you need to opt in to them in the YAML file.
- Customized rules: You can also customize the parameters for certain rules
- Add rules: Write your own rules to match specific requirements
A rule is simply an option for SwiftLint to look for a pattern in the text of your code. Each rule is represented by a unique name and can trigger a warning or a full error, depending on the nature of the rule and your customized preferences. Certain rules around function, file, and line lengths can also be customized to match the nature of your code. (If you want to dive into the details of any rule, Realm, the maintainers of SwiftLint, created a helpful directory.)
Here’s a contrived example of the line_length rule set to throw a warning at 120 characters and an error at 200:
        function_body_length:
          - 120 # warning - ideally this would be 50
          - 200 # error
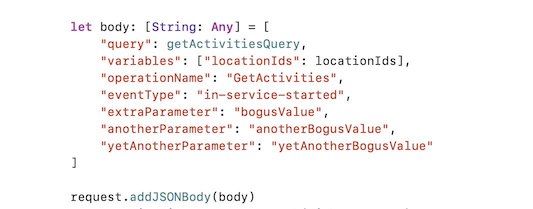
Let’s say I’m getting the POST body dictionary ready for an API request. I could put all this data on one line, and it would compile and work — but it’s hard to read. SwiftLint will catch this and give me a warning.

If I keep adding parameters anyway, SwiftLint will eventually throw an error, keeping me from running the app until the problem is resolved.

If I break the parameters onto multiple lines, SwiftLint is happy — and, more importantly, my code is more readable and maintainable.
Admittedly, it would be hard to find a developer who actually prefers seeing all those parameters on one line, but when deadlines inevitably get tight, bad coding practices like functions a mile long, force unwrapping, and inconsistent spacing become easier for developers to overlook in the rush to get things done. But SwiftLint doesn’t care about deadlines: It will enforce good working habits no matter what.
For a complete list of potential rules in SwiftLint and syntax details, check out Realm’s SwiftLint framework reference.
What about autocorrect?
The primary use of linting is to spot problems in code for the developer to manually fix. If you have prior experience with linting, you might be wondering if SwiftLint supports autocorrect to fix problems automatically. Yes, it does — but only on a subset of the rules. I’ve worked on projects in the past that run SwiftLint’s autocorrect regularly, but generally I find autocorrect most helpful for setting up SwiftLint on a project. Autocorrect is great for fixing whitespace issues, but many rules require (or work best with) a human to make sure the adjusted code is still logically correct.
Tips from our experience
By default, SwiftLint needs to be installed on the local Mac. This can lead to inconsistent versions across different developer machines. Also, SwiftLint is a big, open-source project, so even though it has top-notch maintainers, there is a chance that updates to SwiftLint could slip in security vulnerabilities without one of our developers noticing. To address both of these issues, we use a compiled Unix Executable File of SwiftLint in a shared submodule. This way, each developer and build machine uses the same version of SwiftLint without the need to install it. It also provides the project maintainers with control over updates of the tooling.
We also worked with the iPhone app project client to create a shared set of default rules for SwiftLint across a number of apps. The SwiftLint executable is kept in a shared Git submodule. If one project team wants to customize or override the shared ruleset, they can do so with their own YAML file defined in the project. Here’s what the build phase script looks like to pull this off:
#!/bin/zsh

# Custom YML file specified by the app
CUSTOM_YML=${SRCROOT}/Config/swiftlint.yml

# Placeholder file to request linting with the default config
DEFAULT_FLAG=${SRCROOT}/Config/swiftlint.default

if test -f "$CUSTOM_YML"; then
  echo "Using custom swiftlint YML at $CUSTOM_YML"
  ${SRCROOT}/build_tools/linting/swiftlint --config ${SRCROOT}/Config/swiftlint.yml
elif test -f "$DEFAULT_FLAG"; then
  echo "Using the default lint config in build_tools"
  ${SRCROOT}/build_tools/linting/swiftlint --config ${SRCROOT}/build_tools/linting/swiftlint.yml
fi
SwiftLint allows you to create parent and child relationships between YAML files that combine/import rules from other YAML files (the SwiftLint GitHub page has helpful documentation on this useful organization feature).
Another thing we’ve added is a custom rule to warn against simple print() statements in favor of debugPrint or os_log:
custom_rules:
  discourage_print:
    included: ".*\\.swift"
    name: "print()"
    regex: "((\\bprint)|(Swift\\.print))\\s*\\("
    message: "Prefer os_log() or debugPrint(#file, #function, ...)  over print()"
    severity: warning

Disabling in certain places
As you integrate SwiftLint in certain projects, you might run into issues with code generators that create files that violate your SwiftLint rules. There are a number of ways you can fix this. As mentioned earlier, you can exclude directories of your project file structure inside your YAML file. You can also disable SwiftLint with special comment syntax. For example, we added this line in a MOGenerator template file used to create auto-generated object definitions for CoreData entities:
// swiftlint:disable all
Instead of all, you can also list specific rules. And you can add :previous, :this, or :next keywords to disable SwiftLint for a specific line, so // swiftlint:disable:next force_cast disables the force_cast or force-unwrapping rule on the line below it.
9 months later
I initially added SwiftLint to the client project about 9 months ago. The client loved it, added SwiftLint to other projects, and has helped make some of the shared code examples above possible. It’s now part of all the client’s new apps. As developers rotate on to an app, I find SwiftLint fulfills the goal of keeping the old and new code consistent and clean. Beyond that, in the era of extremely powerful Apple Silicon Macs, SwiftLint serves as one more safeguard against careless mistakes and poor code quality with minimal impact to compile times.
This post gives some insight into how we are using SwiftLint in the real world with one of our clients, but keep in mind that it’s an incredibly versatile tool that can adapt to many different sizes and shapes of projects. This post just scratches the surface of the different rules and configuration options, and I highly recommend checking it out in more detail to see if there’s a way SwiftLint can fit what you’re doing with Swift.