
According to our own Richard Turton, notifications are one of the key interaction modes on Apple Watch. A well-designed notification quickly presents any pertinent information to the user and may also give them the opportunity to act on said information. In fact, to many users, “a notification from your app is essentially your app”1
I’d argue this has become even more relevant in the time since Richard originally shared his thoughts on this topic. Specifically, there are three things I see as primarily driving this increased relevancy:
- The introduction of the
UserNotificationsframework, which added features like mutable content and attachments in addition to a common API across Apple’s platforms. - Improved in app performance.
- Locally scheduled on-Watch notifications.
From the user’s perspective, interacting with notifications on Apple Watch is not that different from the experience on iPhone. From a development perspective, however, the limitations inherent to WatchKit mean that you need to take different approaches to fully integrating notifications into you app than you would when using UIKit.
Watch Notification Demo App
Throughout this article, I’ll be referencing code samples from our Watch Notification Demo app. This project came out of work we’ve done for some clients and our experimentation with notifications on Apple Watch.
The demo app supports multiple triggers for notifications:
- Push notifications
- Local, timed notifications scheduled from a paired iPhone
- Local, timed notifications scheduled directly on the watch
Adding support for either UNCalendarNotificationTrigger or UNLocationNotificationTrigger should be pretty straightforward.2
I did not build a demo server for exercising the push notifications. Instead, I used the excellent Pusher app for submitting the notifications directly from my Mac.
Examples of the JSON notifications bodies can be found in the “.apns” included in the demo app.
Setting Up Your Notifications
If you are doing anything beyond simply launching your app, you’re most likely going to configure category identifiers for the types of notifications you support. iOS and watchOS use this value to determine how your notification should be displayed. You can leverage this value to determine how you are going to process the notification within your apps. For push notifications, the value corresponds to the category key of the aps dictionary. For local notifications, you set the value directly on the categoryIdentifier property of an UNMutableNotificationContent instance.
One of the category-based determinations made by iOS and watchOS is which actions should be displayed alongside the notification. On both platforms, actions appear as buttons beneath the notification’s main body when viewing the notification details.
Categories are represented by UNNotificationCategory instances and the associated actions are represented by UNNotificationAction instances. Apple’s documentation is somewhat inconsistent about whether you are required to register all of your notification categories. The Local and Remote Notification Programming Guide states that you should register all of your categories. However, the documentation for UNUserNotificationCenter setNotificationCategories(_:) indicates that “each category object contains… one or more custom actions”.
Based on my own experimentation, the description from the Programming Guide seems to be more accurate. Following the advice from the setNotificationCategories(_:) would preclude configuring any options for action-less notification categories. As far as I can tell, however, excluding a notification category from registration has no discernible impact on how those notifications are displayed or handled. Given what we’re getting from the documentation, I can’t say with certainty whether this is the intended behavior or an unintended side effect of an implementation detail. Hopefully, Apple will update the documentation to answer these questions.
Working under the assumption that registering action-less notifications is fine, the following method creates three notification categories — “primaryMode”, “secondaryMode”, and “repeating” — and configures a pair of actions for the primary notification. This method also handles any authorization and registration requests needed to receive notifications:
// Registering notifications on iPhone
func registerNotifications() {
  // Configure the actions for the primary category
  let callAction = UNNotificationAction(identifier: UserNotificationAction.call.rawValue,
                                        title: NSLocalizedString("Call", comment: "Call notification title"),
                                        options: .foreground)

  let modalAction = UNNotificationAction(identifier: UserNotificationAction.modal.rawValue,
                                         title: NSLocalizedString("Modal", comment: "Modal notification title"),
                                         options: .foreground)

  // Configure the primary category with the desired actions
  let primaryCategory = UNNotificationCategory(identifier: UserNotificationCategory.primaryMode.rawValue,
                                               actions: [callAction, modalAction],
                                               intentIdentifiers: [],
                                               options: [])

  // Configure the secondary category with no actions
  let secondaryCategory = UNNotificationCategory(identifier: UserNotificationCategory.secondaryMode.rawValue,
                                                 actions: [],
                                                 intentIdentifiers: [],
                                                 options: [])

  // Configure a repeating category with the optional dismissal action
  let repeatingCategory = UNNotificationCategory(identifier: UserNotificationCategory.repeating.rawValue,
                                                 actions: [],
                                                 intentIdentifiers: [],
                                                 options: .customDismissAction)

  // Register the categories with the notification center
  let categories: Set<UNNotificationCategory> = [primaryCategory, secondaryCategory, repeatingCategory]
  UNUserNotificationCenter.current().setNotificationCategories(categories)

  // Request user authentication for displaying notifications and register for push notifications
  UNUserNotificationCenter.current().requestAuthorization(options: [.alert, .sound]) { registered, _ in
    guard registered else {
      print ("Failed to request notification authorization")
      return
    }

  DispatchQueue.main.async {
      UIApplication.shared.registerForRemoteNotifications()
  }
 }
}
As shown, both callAction and modalAction specify the UNNotificationActionOptions.foreground options. This indicates the application should come to the front when the user selects the action from a notification. By default, notification actions run in the background. Additionally, you can opt to require an unlocked device before responding to an action (this is implied by the .foreground options) or to apply destructive styling on the action’s button.
The initialization of repeatingCategory specifies the UNNotificationCategoryOptions.customDismissAction option. This overrides the notification’s default behavior and notifies your application when the user removes the notification from the notification center without triggering some other action. This runs as a background action and there isn’t any way to convert it to a foreground action.
One important thing to know about registering notification categories and actions — the category configuration is interpreted on the delivery device, not the display device. Since local notifications scheduled on the watch are delivered directly to the watch, they do not inherit any of the category characteristics defined on the phone, even if you use the same notification category. If you intend to use watch-local notifications, you will have to configure the categories on the watch as well:
// Registering notification categories on Apple Watch
func registerNotifications() {
  // Configure the action for the primary category
  let modalAction = UNNotificationAction(identifier: UserNotificationAction.modal.rawValue,
                                         title: NSLocalizedString("Local Modal", comment: "Modal notification title"),
                                         options: [.foreground])

  // Configure the primary category with the desired actions
  let primaryCategory = UNNotificationCategory(identifier: UserNotificationCategory.primaryMode.rawValue,
                                               actions: [modalAction],
                                               intentIdentifiers: [],
                                               options: [])

  // Configure a repeating category with the optional dismissal action
  let repeatingCategory = UNNotificationCategory(identifier: UserNotificationCategory.repeating.rawValue,
                                                 actions: [],
                                                 intentIdentifiers: [],
                                                 options: .customDismissAction)

  let categories: Set<UNNotificationCategory> = [primaryCategory, repeatingCategory]
  UNUserNotificationCenter.current().setNotificationCategories(categories)
}
The logic for the Apple Watch implementation of registerNotifications() looks very similar to the phone implementation, but there are a few differences.
First, the “primaryMode” category only has one action and we changed the display title of that action to “Local Modal”. This won’t have any impact on the display of push or phone-local notifications with the “primaryMode” category, but watch-local notifications will just display the single option.
Second, we dropped the “secondaryMode” category configuration because our watch app does not create local notifications for this category.
Finally, we neither request authorization to display notifications nor register for push notifications. The latter is because Apple Watch cannot receive push notifications. The former is a side effect of the structure of the demo iPhone and Watch apps. For purposes of the demo, the iPhone app immediately requests permission to display notifications during first launch. Additionally, the Watch app requests data from the iPhone app via WCSession. Thus, if the Watch app is launched prior to the iPhone app, the user will be prompted for permission to display notifications on their phone and the Watch app will honor this permission.
Depending on your needs and the structure of your apps, you may want to explicitly request authorization for local notifications on the Watch.
Watch Notification Display
On watchOS, notifications are shown using one of three interfaces: static, dynamic, and generic.
You create static and dynamic interfaces within the main storyboard of your WatchKit app. There is a one-to-one relationship between the notification interface and the notification category. If you want to use the same layout for notification categories, you’ll need to duplicate the actual scenes on the storyboard.
As the name would imply, static notifications are basically displayed as-is. The only item configured at display is the label connected to the interface controller’s notificationAlertLabel outlet. This label is populated with the notification’s body text. You are free, however, to modify the look of your static interfaces within the storyboard. The primary caveats are that any images used must be included in the watch app bundle and that you cannot use any interactive controls.
From both the functional and visual standpoint, dynamic interfaces are significantly more interesting. While you still can’t include things like buttons or switches, you can configure dynamic content like a WKInterfaceMap or access resources outside of your app bundle.
You implement your dynamic interface logic in subclasses of WKUserNotificationInterfaceController, primarily by overriding the didReceive(_:withCompletion:) method. The following is an early implementation from the demo app’s PrimaryNotificationController class:
override func didReceive(_ notification: UNNotification, withCompletion completionHandler: @escaping (WKUserNotificationInterfaceType) -> Swift.Void) {
  self.bodyLabel.setText(notification.request.content.body)
  self.dateLabel.setText(PrimaryNotificationController.dateFormatter.string(from: notification.date))

  completionHandler(.custom)
}
The configuration of the UI is fairly straightforward. The important piece is calling the completion handler with the WKUserNotificationInterfaceType.custom argument. This lets watchOS know that the configuration is complete and it should display the dynamic interface. If, for some reason, you wanted to display the static interface, you could instead specify WKUserNotificationInterfaceType.default.
Even without reading the documentation, the @escaping annotation on the argument should indicate that you can call the completion handler outside the scope of the method. You’ve got a brief period of time to download images from a remote resource or perform some other asynchronous task. I don’t believe that specific limit is documented anywhere, but if the completion hander isn’t called within that time, the system will fall back to displaying the static interface. Unlike some other time-limited operations in Apple’s frameworks, there’s no last-ditch notification that you are out of time — configuration of dynamic notifications is pretty much an all-or-nothing affair.
Although dynamic notifications can provide a richer interface than their static brethren, you shouldn’t ignore your static interfaces. Even if you implement a dynamic interface, the odds are quite high that users will eventually see the static interface, too. Beyond the time-out case described above, watchOS will always show the static interface when viewing the notification through Notification Center and when trying to conserve battery power.
The generic interface is the fallback style used by watchOS if you haven’t defined an interface for a given notification category. Similar to the static interface, the generic interface displays the body text from your notification.
When you configure the notification category in your storyboard, the notification name only needs to match the notification’s category — it does not need to correspond to a notification category that you’ve registered with the notification center. Conversely, a registered notification category without a custom interface will use the generic style and display any of your defined notification actions.
A Brief Interlude About Notification Attachments
While I’ve been using, developing, and testing apps, I’ve struggled to consistently understand how Apple Watch deals with notification attachments. I’d frequently see notifications that contained the “Attachment: 1 Image” text, but I’d rarely, if ever, notice the attachment.
It wasn’t until I started deploying apps to a second Apple Watch that I started to notice attachments appearing under certain circumstances.
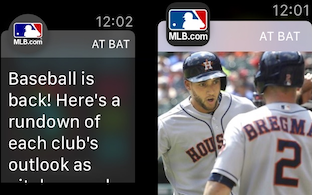
I’m a heavy user of MLB At Bat, so I certainly don’t mean to pick on them. I was wracking my brain, however, to figure out why one Watch was displaying boring-old plain text notifications while the other was was showing an eye-catching image. It took me a disturbing amount of time to realize that the notification on the left was displaying the circular icon of a Watch app while the notification on the right was displaying the squircle-shaped icon of an iOS app.
Even with this information, it wasn’t until we got our hands on watchOS 4 that I really understood what was happening — MLB At Bat seemed to be using the static notification interface and Apple added default support for image attachments in watchOS 4.
That said, there doesn’t appear to be any way to modify the placement or appearance of the attachment image — unlike the notificationAlertLabel, there’s nothing in the storyboard for you to modify.
If you need more customization than what’s supplied by the static interface, you always have the option of creating a dynamic interface for the notification category. You could also use this technique to display your attachments on watchOS 3 while leveraging the static interface improvements for users on watchOS 4.
If you’ve previously dealt with attachments on iOS, the logic is more akin to the processing done in notification service extension than customizing the UI display in a notification content extension.
On the iOS side of the fence, the notification service extension is responsible for mapping your notification to an appropriate attachment, downloading the data to disk, and creating the appropriate UNNotificationAttachment.3 When populating the custom UI, the notification content extension accesses the attachment’s data via a secure scoped resource.
The approach taken in the notification content extension doesn’t work for dynamic watch notifications, however. Since the dynamic interface code is running on the watch, it cannot access the attachment data that’s stored on the phone. Instead, you need to re-download the data as part of your WKUserNotificationInterfaceController implementation:
override func didReceive(_ notification: UNNotification, withCompletion completionHandler: @escaping (WKUserNotificationInterfaceType) -> Swift.Void) {''   // Label setup from earlier implementation

  let userInfo = notification.request.content.userInfo
  guard let notificationIdentifier = userInfo[UserNotificationInfoKey.notificationAttachmentIdentifier.rawValue] else {
    completionHandler(.custom)
    return
  }

  var attachmentURLComponents = URLComponents()
  attachmentURLComponents.scheme = "http"
  attachmentURLComponents.host = "martiancraft.com"
  attachmentURLComponents.path = "/downloads/\(notificationIdentifier)-Watch.jpg"

  guard let imageURL = attachmentURLComponents.url else {
    completionHandler(.custom)
    return
  }

  let attachmentDownloadSession = URLSession.shared.dataTask(with: imageURL) { (data: Data?, _, error: Error?) in
    defer {
      completionHandler(.custom)
    }

    // TODO: Attempt to create a UIImage from the data and configured the interface's notificationImage view
  }

  attachmentDownloadSession.resume()
}
There are three key additions to the PrimaryNotificationController shown earlier:
- Determining whether or not the notification has an attachment identifier and, if not, immediately completing the configuration process.
- Mapping the notification identifier to a URL a remote URL.
- Downloading and processing the attachment data and calling the completion handler when that completes.
In the demo app, we’re simply associating the attachment file’s base name with the “notificationAttachmentIdentifier” key in the notification’s userInfo dictionary. Additionally, we’ve decided that we’ll have watch-specific variants of our attachment images available via the “-Watch” suffix. The details of this logic are almost entirely up to you. I suspect that, more often than not, that the logic will be similar (or identical) to the logic in your notification service extension.4
As an alternative, I experimented with requesting the attachment from the iPhone via WCSession. While the logic worked, I was concerned that activating the session might take longer than allowed and cause the system to fall back to the static notification.
Handling Notifications
Once your app is receiving and displaying notifications, you probably want to customize how it reacts to those notifications. When a user triggers an action from your notification, the default behavior is to simply launch your app — either in the foreground or the background, depending on how the action is configured.
To implement specific functionality for the notification actions, you need to provide an object that implements the UNUserNotificationCenterDelegate protocol and assign that as the delegate of the app’s current UNUserNotificationCenter.
Since the iPhone and Watch apps have their own instances of UNUserNotificationCenter, each app must also have its own delegate implementation. You’re responsible for configuring the delegate prior to the completion of the app launch process, likely as part of your applicationDidFinishLaunching() implementations.
The UNUserNotificationCenterDelegate protocol currently defines two optional methods — one for responding to selected notification actions and one for being alerted to incoming notifications while the app is frontmost.
Implementing the userNotificationCenter(_:didReceive:withCompletionHandler:) method in your delegate allows you to customize your app’s response to notification actions. The response parameter encapsulates both the triggering notification and the selected action:
func userNotificationCenter(_ center: UNUserNotificationCenter, didReceive response: UNNotificationResponse, withCompletionHandler completionHandler: @escaping () -> Void) {
  print("Notification Category: \(response.notification.request.content.categoryIdentifier)")
  print("Action Identifier: \(response.actionIdentifier)");

  // Process the notification

  completionHandler()
}
One lesson I learned during a recent project was that you should always validate your actionIdentifier. If your notification has no actions, don’t just assume that the action identifier will be UNNotificationDefaultActionIdentifier. Likewise, if the identifier doesn’t match one of your custom actions, don’t assume that action is the default identifier. For some time prior to watchOS 3.1.3, there was a bug in the UserNotifications framework that caused userNotificationCenter(_:didReceive:withCompletionHandler:) to be called twice for notifications with dynamic interfaces. The first time, the notification response would specify UNNotificationDefaultActionIdentifier as the action; the second time it would specify an empty string. If you naively assumed that the action identifier would either be a custom value or the detail identifier, you’d end up processing the notification twice.
I was pleasantly surprised to see that this issue was resolved by watchOS 3.1.3, but I’m certainly not going to go back and assume that I’ll always get a valid action from the framework. Beyond supporting users who might not be on the latest version of watchOS, the explicit check protects against similar issues that could potentially occur in the future.
Interacting with notifications that are received while your app is frontmost requires implementing UNUserNotificationCenterDelegate’s other method, userNotificationCenter(_:willPresent:withCompletionHandler:). At a quick glance, the method signature looks fairly similar to the previously-discussed delegate methods, but there are two main differences:
- The second parameter is a
UNNotificationinstance instead of aUNNotificationResponse. - The completion handler takes an argument.
The difference in the type of the second parameter makes sense, since this method is called prior to the notification being displayed; at that time, there has not been any response. This leads to the reason for the completion handler’s argument — you can specify if and how the notification should be displayed:
func userNotificationCenter(_ center: UNUserNotificationCenter, willPresent notification: UNNotification, withCompletionHandler completionHandler: @escaping (UNNotificationPresentationOptions) -> Void) {
  // Check if the app is actually in the background
  guard WKExtension.shared().applicationState != .background else {
    completionHandler([.sound, .alert])
    return
  }

  // Figure out whether or not to display the notification based on the app mode and the
  // notification category
  let presentationOptions: UNNotificationPresentationOptions
  if let rawMode = UserDefaults.standard.string(forKey: CurrentModeKey), Mode(rawValue: rawMode) == .secondary
    || UserNotificationCategory(rawValue: notification.request.content.categoryIdentifier) == .repeating {
    presentationOptions = [.sound, .alert]
  } else {
    presentationOptions = []
  }

  completionHandler(presentationOptions)

  // If the notification isn't presented, process it and clean it up
  if presentationOptions.isEmpty {
    // Request that the paired iPhone remove the notification from its notification center, if present
    self.connectivityManager?.send(message: ClearNotificationCommand(identifier: notification.request.identifier))

    // Process the notification, if desired
  }
}
In the case of calling the completion handler with presentation options, you’re essentially done with the notification. The notification will be presented to the user with the specified options. At that point, you probably just want to let the user interact with it as they normally would. Of course, there’s nothing stopping you from doing additional work in this case.
Passing an empty set of presentation options to the completion handler suppresses the display of the notification and can be useful if you want to consume the notification and update the app in place. One thing to note is that notifications delivered to the iPhone will remain in the phone’s notification center. Suppressing the display on the notification on the Watch is not sufficient to make it go away. If that’s what you want, you’ll need to send a request to the iPhone through WCSession to accomplish this.
With the changes to the frontmost app state in watchOS 4, userNotificationCenter(_:willPresent:withCompletionHandler:) takes on an even greater role. Under watchOS 4, your app will remain frontmost for a few minutes after the screen shuts off. Any notifications received during this time will be handled by this method. You should account for this state when deciding how your app will handle the notification — don’t simply assume that your users will see the results of your processing.
You can detect this state by checking the value of WKExtension.shared().applicationState. If the value is background, then you know that your app is not on screen and you should act accordingly.
Unfortunately, there does appear to be a bug in watchOS 4 that causes this method to be called multiple times for a single notification in this scenario. The notification is only presented once (assuming you provide a presentation option), but any other code in the method will be executed multiple times unless you take steps to prevent it.
Processing those Notifications
In my experience, there are basically three ways that notification actions can be processed within your app:
- You can rebuild your applications interface hierarchy around the notification action
- You can handle the notification within the current state
- You can open a system URL
If you’re coming from building iPhone apps, the idea of rebuilding your app’s interface mid-use might seem excessive. However, this is one of the key differences between building apps in UIKit and WatchKit. In UIKit, we have a number of hooks for determining the interface’s state — if we’re using stock UIKit containers like UINavigationController or UITabBarController, we can figure out exactly how to get from our app’s current state to the final state. When working with WatchKit, however, our options are much more limited. We can only determine the root interface interface controller and (in watchOS 4) the visible interface controller. There’s no built-in way to interrogate the app and figure out how to transition to our final state and there’s no easy way to move between multiple interface controllers without doing it one… interface… controller… at… a… time…
Rebuilding your apps interface hierarchy is the easiest and most fool-proof way to show the user the information most relevant to their interface action.
Handling notifications in-place makes the most sense when your app has a flat navigation hierarchy. If all you’re doing is updating a single screen, it should be pretty straightforward. Notification actions with no impact on the UI are also good candidates for in-place processing, although I might ask why you weren’t simply processing the action in the background.
Somewhat surprisingly, actions that display a modal are also good candidates for in-place processing. Regardless of whether or not your root interface controller is active, it is still capable of presenting a modal interface on top of your app.
In-place notification handling and rebuilding your app’s interface hierarchy aren’t mutually exclusive. Depending how your app is structured, you may be able to decide at runtime whether you can handle a notification in place or if you need to reset your interface from scratch. Conversely, even the simplest app should handle the case of launching in response to a notification action and processing the notification before the root interface has been instantiated.
Opening a system URL is something of an edge case, but it does require some additional steps. System URLs are specifically for starting a phone call or sending a text message. From a user interface standpoint, opening a system URL displays a modal confirming that the user actually wishes to make a call or send a text. Given how modal interfaces can be handled, opening a system URL might seem like a good candidate for in-place handling.
Sadly, that is not exactly the case. When you open a system URL, you’re passing control off to the OS as opposed directly displaying a modal. Under certain circumstances, that handoff does not go well. One of those specific circumstances is when you call WKExtension.openSystemURL(_:) immediately after resuming the app, as you would when triggering a system URL from a notification action.
In this scenario, your app ends up in an weird, indeterminate state. It’s not frozen, but neither is it displaying the system URL interface nor actively responding to touches. However, if you dismiss and resume the app, it returns to a usable state. The best way I’ve thought to describe the phenomenon is that the OS seems to think the system URL interface is on screen even though it’s never been displayed.
While there is a solution, it’s not one I’m particularly proud of proposing:
DispatchQueue.main.asyncAfter(deadline: DispatchTime.now() + .seconds(1)) {
  if let phoneNumberURL = URL(string: "tel:8675309") {
    WKExtension.shared().openSystemURL(phoneNumberURL)
  }
}
Unless normal circumstances, I’d be loath to suggest simply introducing a delay as the solution to an issue. In this case, I’ve exhausted all my other ideas. It appears that opening a system URL requires some distance from the app resumption process that’s just not possible to achieve by waiting for the next run loop pass or interface controller activation.
What about LTE?
Now that Apple’s released an LTE-capable version Apple Watch, you might be asking “how does that affect the handling of notifications?”
The answer: not much.
For starters, there’s no new WatchKit equivalent to UIApplication’s registerForRemoteNotifications() method, so there’s no way register for push notification in your watch app.
Furthermore, when your Apple Watch is disconnected from your iPhone, notifications are not forwarded to your wrist. Therefore, the only notifications you’ll get are local notifications generated on the Apple Watch itself.
If you’ve already got older notifications on your Watch when you disconnect from your phone, they will remain accessible. If you trigger a background notification action from a push notification, it appears that the action will be queued until your watch reconnects with the phone.
Update: When your Apple Watch is disconnected from your iPhone, notifications are supposed to forward to your wrist. I’m apparently one of the lucky few (one?) for whom this doesn’t happen.
When it works, you shouldn’t need to do anything additional in your apps to support the functionality. Foreground actions will process normally and background actions will be sent back to your Watch.
From a technical standpoint, LTE doesn’t appear to change much of the overall notification picture. The main differences are behavioral — we need to be aware there are more scenarios where users will interact with our notifications, either local or previously received, when their phone is not present. watchOS 3 gave us the ability to run apps independently of an iPhone. The Apple Watch Series 3 with LTE increases the likelihood that users will actually do that.
We’re closing in on the third birthday of the Apple Watch and, over the intervening years, we’ve learned quite a bit about building experiences that makes sense on the wrist. We typically don’t need to bring over the full experience of our iOS apps. Often, we do need to give our users the ability to see and act on pertinent information at a given time. Providing a rich notification experience can be key to that.
-
Doug LeMoine, Apple Design Evangelist during Planning a Great Apple Watch Experience at WWDC 2017 ↩
-
UNLocationNotificationTrigger instances can only be set up on your iPhone — the API isn’t available on the Apple Watch. ↩
-
This applies to remote notifications. For local notifications, you configure the attachment when creating your UNNotificationRequest. ↩
-
OK, I cheated a bit for the demo app and used local notifications to demonstrate attachment processing on the watch. This let me avoid setting up a notification service extension, but required that I include the otherwise-extraneous notification attachment identifier with the location notification. ↩